Alright, so I'm making a couple little plants for some people in the States. A woman I work with was saying she uses the Krylon Crystal Clear Glaze on her sculpey/clay pieces, and since I have almost a full bottle left over from glazing the chess board, I decided to give it a shot. Only complaint is I like the control a brush-on glaze gives me, it's easy for me to get into small crevices without getting glaze all over my hands. Also fumes aren't fun.. but my god the SHINE. The pieces look AMAZING, I mean really, what a difference! I am very impressed, I will be using the Krylon Glaze exclusively from now on.
Highly recommend for all you clay artists out there!
Posted here since my scanner isn't working, pattern taken from this book.
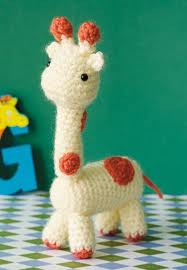
Finished size:
About 8 inches.
Materials:
LION BRAND Vanna's Choice Baby [medium 4] Worsted Weight Yarn [3 1/2 ounces, 170 yards (100 grams, 156 meters) per ball]
1 ball #098 Lamb (A)
1 ball #132 Goldfish (B)
or colours of your choice
crochet hook size G-6 (4.25 mm) or needle sized for gauge
stitch marker
large eyed blunt needle
Additional materials:
2 plastic safety eyes, 6mm in diameter
Fiberfill stuffing
Gauge:
Exact gauge is not essential for this project.
Stitch explanation:
sc2tog (sc decrease)
Insert hook into st and draw up a loop. Insert hook into next st and draw up a
loop. Yarn over, draw through all 3 loops on hook.
Body:
With A, ch 2.
RND 1: Work 6 sc in 2nd ch from hook. Place marker for beg of rnd; move marker up as each rnd is completed.
RND 2: 2 sc in each st around - 12 sts.
RND 3: (2 sc in next st, sc in next st) 6 times - 18 sts.
RNDS 4 - 18: Sc in each st around.
Begin to stuff piece firmly. Continue to stuff as work progresses.
RND 19: (Sc2tog, sc in next st) 6 times - 12 sts.
RND 20: (sc2tog) 6 times - 6 sts. Fasten off.
Head and neck:
With A, ch 2.
RNDS 1 - 5: Work Rnds 1 - 5 of body - 18 sts.
Begin to stuff piece firmly. Continue to stuff as work progresses.
RND 6: 2 sc in each of next 6 sts (for face shaping), sc in last 12 sts - 24sts.
RNDS 7 & 8: Sc in each st around.
RND 9: (Sc2tog) 6 times, sc in last 12 sts - 18 sts.
Following package directions, attach eyes to face.
RND 10: (Sc2tog) 9 times - 9 sts.
RNDS 11 & 12: Sc in each st around. Fasten off.
Legs (make 4)
With B, ch 2.
RND 1: Work 8 sc in 2nd ch from hook; change to A in last st. Place marker for beg of rnd; move marker up as each rnd is completed.
RND 2 - 7: Sc in each st around. Fasten off.
Horns (make 2):
With B, ch 2.
RND 1: Work 4 sc in 2nd from hook. Place marker for bed of rnd; move marker up as each rnd is completed.
RND 2: 2 sc in each st around - 8 sts.
RND 3: (Sc2tog) 4 times; change to A in last st - 4sts.
RNDS 4 & 5: Sc in each st around. Fasten off.
Ears (make 2):
With A, ch 2.
RND 1: Work 4 sc in 2nd ch from hook. Fasten off.
Large spot (make 2):
With B, ch 2.
RNDS 1 & 2: Work Rnds 1 and 2 of Body - 12 sts. Fasten off.
Small spot (make 3):
RND 1: Work Rnd 1 of Body - sts. Fasten off.
Tail:
With B, ch 6. Fast off leaving a 1/2 in. (1.5 cm) end to fray at end of tail.
Finishing:
Sew Neck to Body. Sew Horns to top of Head. Sew Ears to Head. Stuff Legs and sew to Body. Sew Tail to end of Body. Sew Large Spots to Body, and Small Spots to Neck. Weave in ends.
~~~
I wrote that word for word! Also there's a pattern for another one called Georgina the Giraffe here [you may have to sign in/create an account to see it, but it's a free pattern]. I think the one I posted here is cuter, but that's a personal thing! Hope this was helpful :)
PS: if you can, buy the book I linked in the beginning where this pattern is from, the other animals in it are extremely cute ^^.
I'm super excited! After I posted my chess board on one of the many forums I frequent, I had such an interest that I discussed opening a business with one of my best friends. I would not be able to sell the Plants VS Zombies figures as they are protected under the copyright law, but I brainstormed some ideas and shared them with her and she's on board! She's an amazing artist so she will be drawing and I will be recreating the drawings with clay. I don't want to post details until the shop goes up since I already did a quick Etsy search and found our ideas to be unique. Not that I'm trying to flatter myself saying people are actually reading this, but after certain events I've witnessed regarding other sellers I wouldn't want to take a chance someone would beat me to the punch.
I've looked up laws regarding small business in Canada and we would need to get a business license. This doesn't bother me at all, I would like to be all official and such. I want to get all this running before June though since the process for requesting the license will change this summer and it becomes a bit more complicated [more forms].
And in other news: my boyfriend is a sweet heart :) We went out tonight for Valentine's Day and had dinner, he made me two of these cute little cards. When I say made, I mean literally he made them from scratch.. he even made the PAPER. They were adorable and so thoughtful, I was not expecting anything handmade and I really appreciated that he took the time to make those rather than go out and buy them..it just made them that much more special to me. No one I've ever been with has made me anything, and so far on the list these are the third and fourth things he's crafted for me. Apparently he made something else but forgot it at work so I have that to look forward to next time I see him ^^~
The presents I gave him I bought wayyyy in advance. I bought him a giant microbe plushie and also this book called "12 Ways to Say I Love You" that you fill out. I don't really know how to describe it accurately but it's a wonderful gift for anniversaries and other romantic occasions. You can check them out here and definitely check out the giant microbes, they are amazing and the customer service at the site is top notch! There is a seperate site for Canadian orders as well :)
And that's all for tonight!
Happy Crafting~
Alright, so this is what I made for my boyfriend's birthday:
We both play an online game called Plants VS Zombies, and while brainstorming with a friend I decided to make figures from the game out of polymer clay and then to make a wooden chessboard. The whole process took me about a month, but was well worth it! He loved it.

The above picture is the first figure I made. I used two types of plants from the game [each made up an opposing side]: day plants, and night plants. There are also water plants but they're a little more complicated to make. The Chomper is from the day side and I also had to add coloured floral wire after baking to create the stem. There are a few other day plants for which I had to do this. I added after baking rather than before because floral wire is covered with coloured plastic and I was concerned the plastic may melt during the baking process. I made a hole in the base and in the headpiece before baking for the stem to fit in and glued it with industrial strength adhesive.
I really like this adhesive, it provides a very strong bond with a bit of flexibility, which is unlike crazy glue and why I prefer the E6000 to it.

There are definitely a few things I would like to do differently. I bought some circle fondant cutters to cut out the bases but realized when I brought them home that they were a bit too big so I had to mold them by hand due to a time constraint [I really needed to get started THAT night]. I wish they looked more professional but everyone's telling me I'm being too picky, we're always harder on the work when it's our own though!

The board is made out of oak, made by me with a little help from my dad [I'm not that great around circular saws]. I didn't really prime it, I just put on a ton of coats of the light green acrylic paint. I used Folkart and Americana paint on both the board and box used to hold the pieces.

I bought the box from Michaels and primed it with white acrylic before painting it with the green. I used white first because the box was patterned already and the colours were a bit dark. I knew it was going to take quite a few coats to cover and was afraid I would not have enough of the green to do it.
I used painter's tape in a criss-crossed pattern to create the squares on the top of the board. I only did one coat [again, time constraint] but would've liked to do two and make the dark green more opaque.
I finished both the board and box with Krylon glaze. Since I did this in my basement, I didn't have ventilation other than a very slow moving fan. Don't do what I did, using spray glaze/paint without ventilation is NOT a good idea. Normally I would do this sort of thing outside, but it's the winter and so I was unable to.
And that was my project! It was very labour intensive but like I said, totally worth it in the end and I would do it again in a heartbeat. I think it goes without saying, but as a crafter it really makes a difference when you make something for someone who will really appreciate and cherish it. I'm leaving the link to my Flickr photo album for anyone who would like to take a look at additional pictures, there are so many that I don't want to photo dump them here.
Click for more pictures!
Click here to check out Plants VS Zombies!
Happy Crafting~
Alright, so I've been MIA for a while because I've been working on my top secret project! It's a birthday present for my boyfriend. His birthday is today, but his birthday dinner is tomorrow so I will be posting pics and explanations of the project this weekend at some point. For once I have both days off and I'm going to take a nice break! No crafts, no nuthin'.. just sitting on my butt with a book. It's going to be wonderful!
I'll share something I found out today [I'm always learning something new from my co-workers] about painting on canvas with acrylics. I'm sure you more experienced painters out there already know this, but I'm a novice at best so it was news to me! A customer came in today asking what she could use on her finished piece to give it a high gloss finish. I had no clue so I brought over my co-worker, who paints [and is super talented.. the jealous, I have it] and she told the customer that she needed to wait a month for her picture to cure first! I had no clue you needed to wait, but it makes sense since my co-worker told her that even though the paint on top looks and feels dry, the paint underneath may not be. And of course when you spray the gloss on, it keeps the paint underneath from drying completely. Also you need to wait a year to do this with oils. A YEAR.
Good thing I'm terrible with oil paint..
So that is what I learned today! And now to put the finishing touches on my gift!
Happy crafting~

