Ok so it's like I've been in a coma for several months, I know. I started my [not so new now] job in June and since I'm full time I have no time for anything. I'm exhausted when I get home and just want to sit on my butt.. well or I get home at like 10 pm and only have time to eat before I go to bed for my 9:30 am shift. I haven't really crafted anything, but I made something for Halloween!
I bought my boyfriend this cute Beanie Baby bat and decided to make it a little kraft paper trick-or-treat bag, but I had to think about what to put in it. Then one night the week before Halloween, I was over at his house and he was playing with his cat Fidget and he randomly said "I wonder what Fidget would look like dressed as a pumpkin" and so, my Cat O'Lantern was born.
His cat is orange so it worked out quite well! Also can I just say how much I freaking LOVE Decoart's Triple Thick glaze? That is with ONE coat, it's flawless! All this time I've been using spray glazes thinking it was easier and the finish would be better than any brush on, I was totally wrong! This is now my go-to glaze, I will never ever touch a spray again.
I also used an extra fine Sharpie Paint Pen to draw on the eyes and whiskers. Those pens are fantastic, very easy to use and dry instantly so no need to worry about smudging! Always a good thing when you're clumsy like me ;) I DID mess up one side of the whiskers, it was driving me mad [I have a bit o' the OCD] but my boyfriend didn't seem to notice.
And now I'll end my post with how excited I am about my Paperclay. I've heard such great things about it, so I went out and bought a pack after work today. I love using Sculpey but I feel like it's such a waste of electricity to use a standard sized oven to bake a few small things. If the Paperclay works out, I will just switch over to it. There's two downsides though, Paperclay is white so I will have to paint what I make and then of course that takes extra time. Strangely though, I like doing intricate things most people find annoying, I can see myself enjoying the painting of tiny charms aspect. I can also put my old jewelry rack to good use, I'm going to hang my charms off of it to dry.
And now I'm off to play with my clay! I'll let you know how it all turns out ;)
Happy Crafting~
I'm trying to finish the shell border on the baby blanket and I've run into a GIGANTIC knot in my yarn ball. I usually re-wrap the yarn by hand to prevent this from happening before I begin, but I was taking advice from another knitter who said if you just use the string from the middle of the ball you have no problems. Apparently this isn't true.. or I did something wrong.
I had to take out the entire 3 sides of completed border and cut pieces of knot out.. now I'm trying to untangle the rest slowly. It's very frustrating.. also I want to get this done because I bought a pattern off of Etsy tonight. I'll be putting up a blog post on that seller within the next few days so look for that!
Alright, I was just taking a quick breather from my frustration to type this haha, I need to get back to the epic knot :( HOPEFULLY, I can finish this sucker by tomorrow!
Happy Crafting~
So things have been just insane.. things at work went down hill real fast. I can't talk about it publicly, even though there are a lot of very negative opinions I could express, but what it's come down to is that I have quit my sales associate position with Michaels BUT I will be staying on as a Bead Academy Instructor. I did get a full time job, with benefits, elsewhere [actually at a company I've worked for previously, which really is a fabulous place to be] so that is a good thing, but I will truly miss the Michaels staff. Most of the ones at my store have also resigned though, so it would not have been the same if I had decided to stay on.
Anyways! Enough of that!
I have an early shift tomorrow but I've got a bit of a Tudor's obsession and I'm rewatching the series, on Season 2 right now ;) I'm going to watch an episode and finish up the extremely late baby blanket I owe my friend [sorry it's taking so long, Jan :(]. Ok maybe not finish it completely, I'll need to do the edging on it tomorrow after work but I can finish up with the blue!
Also in the works is a necklace I'm making as a gift for a co-op student who has been working at Michaels for the past few months. Really she gets no love from management and she does such a great job, also she's a sweet heart and hugs me every time she's in! She deserves something nice as a thank you for all her hard work I think. That will have to be done before Monday since that is her last day. I asked her what her favourite colour was and she told me purple, so I picked out some nice, sparkly beads in three coordinating colours [a smokey lilac, a darker purple, and a dusty rose] and a nice delicate silver chain. I wanted something feminine and pretty, not too over the top so that it would be wearable on any occasion. I really hope she likes it!
That's what's going on in my crafting universe right now. Still looking into that new camera and also contemplating a makeup blog, haven't thought of a name yet though. I need the new camera to properly show off my pretties though, the one I have now just doesn't do them justice.
Well, better not keep Jonathan Rhys Meyers waiting any longer ;)
Happy Crafting~
Whew, it's been a crazy couple weeks I tell you. The store I work at offers different crafting classes.. cake decorating, crocheting/knitting, and scrapbooking but we have not been able to find a bead instructor. Because of that, I've been the one running the bead demos and helping customers in the bead section with general inquiries. My manager approached me last week asking me if I'd like to be the instructor, the woman in my store who runs the classroom activities recommended me to the position. I said yes and I'm on my way to certification!
Tonight I received the email that told me where to sign up and how to get started, I completed a basics exam and passed, then submitted pictures of two projects with explanations and those passed as well! I finished all the preliminaries and now I'm onto the beginning of the certification course.. problem is you have to print out a guide before started annnnnd my printer ink cartridge is literally empty. I was SO excited, I wanted to start tonight! I have to wait until tomorrow though when I can replace the cartridge.
This is probably a good thing though, I'm dead tired from an early morning shift so I probably wouldn't absorb much. I can't wait to get home tomorrow to get cracking though!
I've also been keeping myself busy by crocheting a baby blanket for my best friend's new baby cousin. Normally you're asked to make these things BEFORE the birth but she didn't think to until after. The baby is about 3 weeks old, so definitely not too old for a snuggly blanket. Now, I haven't crocheted in YEARS but I've wanted to get back into it. I do knit on occasion but a co-worker of mine told me that crocheting is just much faster, and time is not on my side so I decided to pick up the hook again.
I originally learned to crochet from my great aunt. She was a MASTER, she would sit with this metal bowl in her lap that contained her crochet thread and crochet the most intricate doilies and table runners you've ever seen. She did it at lightning speed without even glancing at her work as she went, and she NEVER made a mistake. I was always fascinated watching her do it as a child and my nana had already taught me to knit so she decided to teach my to crochet. Unfortunately, my great aunt suffered a dibilitating stroke 5 years back and has never fully recovered. She lost a lot of movement in the right side of her body and can no longer crochet but I'm absolutely determined to teach myself how to make those beautiful doilies. Although I'm certain I'll never be able to produce them as quickly as her.. and without looking.
Anyways, I went around online searching up a simple pattern, and then decided I would just knit a giant granny square and then add a shell border to it. I found the following video extremely helpful in showing me how to start the square:
I totally suggest checking out this lady's other tutorials as well, especially if you're a beginner.. her videos are super helpful! Once I saw her do a couple rounds I just went out on my own and kept going round and round the square. I am on my third ball of wool, this will be the last before I start my shell border. I'm using Bernat Softee Baby in Baby Denim Marl for the majority of the blanket. It's actually a much softer baby blue than what's shown in the thumb nail on the site. I'm thinking of using antique white to create the shell border rather than continuing on with the blue colour. I'll have to get some opinions on that at work I think though.
Anyways, I hope to be done this blanket by the end of the weekend.. I also have to throw together a birthday card for my nana either tomorrow or Thursday night. My mom is going to London to visit her on her birthday and is going to take the card with her for me :)
My week is looking busy craft-wise but I'm totally not complaining! Once I complete the baby blanket I will post the results!
Happy Crafting~
So, before we get down to some delicious business, I know I promised photos of those charm bracelets. When I was hand drilling the holes, I broke the tip off of my bead reemer [sadface] SO I went onto my trusty beading supplies site and ordered a glorious electric bead reemer. They state up to 6 weeks for delivery but in the past I've received things from them within 3 weeks. I can't even believe it didn't occur to me to search one of these babies out. I'll let you know when I get it and do a mini review of the reemer.
NOW onto the business of the day! It's Easter, of course, and I have a confession to make: I have an addiction.
Yup, I am addicted to Creme Eggs. Really though, who isn't [besides my boyfriend who is also insane]?! I'm always saddened when these babies disappear and I try to stock up on them while they're around. BUT I've stumbled upon something fabulous. Well, it was more me surfing around Facebook and noticing one of my awesome friends posting about these little treats. You can make your own eggs at home!
Now I haven't tried this yet, but here's the recipe for them. These look ridiculously easy to make, and once I run out of my current stock, you better believe I will be giving this recipe a shot!
Also for the more adventurous Creme Egg lover, take a look here for more recipes using Creme Eggs.
That's all for now! I hope you all have a fabulous Easter <3!
Happy Crafting~
I just spent a good 20 minutes removing the sticky from the back of some dimensional stickers. All I have to say is that Goo Gone is a lifesaver [and it smells awesome]! I'm planning on drilling holes into the stickers and making charm bracelets for a couple friends of mine that I'm seeing tomorrow.
I have to get these done tonight, even though I have an early 6am shift tomorrow.. I probably should've come straight home after work this morning to get these started. It's the glaze that's taking forever, since I have to glaze one side at a time and wait for it to dry fully. I rushed the job last time and got weird little bubbles in one side of my charms.. it was not attractive.
If I'm not too exhausted I will post pictures of the completed bracelets tonight! If not, expect them tomorrow ;)
Happy Crafting~
Alright, so not crafting related really but I am just so excited! It seems there is another job posting but THIS one would mean no travel and no moving, it's still within the company but at a different store. I was caught completely off-guard today and asked to go to head office for a meeting, and then I was sent off to the other location for an interview with the manager.
I feel I did splendidly during the interview, and the manager is extremely nice, I can see us getting along well. I've been awake since 4am [early 6am shift today] and only slept 2 hours last night but I'm still jumping up and down.
Best thing about this job? I get to see all the product fresh off the truck ;) Putting away stock is where I get my ideas, I see something and I go "hey, that's new.. wonder what I could do with it" and my creative juices start to flow! I'm so happy that I may get the opportunity to continue to work in a creative environment, it's so important to enjoy what you do!
Anyways, I just wanted to share my excitement! If I get the job I will probably post more details, I just don't want to jinx it right now ;)
Happy Crafting~
I found my coloured ball chains! I have quite a few different colours, although I'm going to have to look into where I can get more. I bought all these dirt cheap on clearance.. I'm the 'clearance expert' at my store, 9 times out of 10 when I go in I'm playing with the clearance merchandise. Taking it out of boxes, re-pricing it, putting it out.. the bad thing about this is I see all the deals and spend all my money :(
Anyways! Here's one of the necklaces, I ended up making 4 charms total:


These turned out better than I expected, I threw them together quickly just because I wanted to see how the end result would look. I took some advice from one of the videos I watched, I made the bases first and put them in the freezer for 10 minutes before adding the tops. This makes it so I can handle the base without leaving fingerprints or altering the detail I put on beforehand. I really wish I had thought of that little trick before, it would've made making those chess pieces SO much easier!
I also added glitter to the tops for more bling. I'm giving one charm to someone I work with and sending another down to the states. The woman I'm sending it to doesn't know I'm sending it, she loves cupcakes so I thought of her when I made them.. I would like to sell these in the future, keeping the basic design the same but changing up colours and embellishments, but I want to name them after her. I'm going to ask her permission to do so after she receives the necklace :D
Also I asked that lady I work with about the polymer clay icing, but she said she just softens and mixes the clay by itself to get the correct consitancy? I don't see how that would work.. I think I know what I'm going to do to make it, we'll see how it turns out. I'm basically counting the days until I get paid so I can afford to experiment!
That's all for tonight!
Happy Crafting~
Tonight I made a few cupcakes out of polyer clay, I pushed some eye pins into them so I could put them on necklaces. They turned out alright, I'm not entirely satisfied with them.. the glaze on them is drying now. Provided I can find the chains I bought the other week, I will take pictures tomorrow.
I didn't create the icing on top with polymer clay whipped cream though. I've been researching how to make it, there's a lot of different recipes but there's many questions I have about it that were not answered by any of the videos I saw or the blogs I read. However I'm pretty sure one of the ladies I work with knows how to make it, so I'm going to ask her tomorrow during my shift. Hopefully she can give me some tips so I can mess around with the icing on Friday when I get paid :D
Annnd I work at 6am tomorrow, so bed time for me now!
Happy Crafting~
I know I said I'd post this on Thursday but I got distracted.
Also I just realized I meant to give a couple of these clips to my friends annnnd I forgot.. where is my brain these days?!


Two of the styles are actually the same donut, just on different clips. The donuts are dimensional stickers, I removed the sticky portion off the back and then glazed them. I used an industrial strength glue to attach them to the clips, those babies aren't coming off any time soon ;)
There was a third style of donut in the pack, but I ruined the colour of the glaze on one, it was really obvious so I decided to just keep those two to experiment with later. The sticker is actually a bit hard, but I want to see if I can drill a small hole into it to make it into a charm. If I can drill the hole into it easily without ruining the sticker, I could potentially turn them into earrings and pendants as well!
Also that necklace from the other week is still in the works.. I want to get a textured sheet so I can emboss a floral pattern into the focal piece, we're out of the sheet I want at work, so I'm waiting for another shipment to come in. And that's all for now!
Happy Crafting~
Recently we had to reset the scrapbooking section at my store [actually we're still resetting it.. it seems neverending :(] and after spending hours upon hours putting away thousands of stickers, it occurred to me that I could put some of them to good use. Nowhere does it say that stickers can only be used on paper, right?
I'm going to turn them into jewelry and hair accessories. I'm talking specifically about dimensional stickers, because they're "puffy" as opposed to the every day stickers that are flat. Though if I can figure out resin, I may mess around with the flatties as well. We have a new line of dimensional stickers that are just PERFECT for what I have in mind. Yesterday I purchased a pack with donut stickers. I removed the sticky banding off the back and glazed them to seal them. Though I THOUGHT I got all the residue off, the glaze showed me that that was not the case. I didn't glaze them all though, so I'm going to try some Goo Gone to remove it from the backs of the rest. I will then be fixing them to hair pins! I want to test their durability and wear, so I'm giving a couple sets to two of my friends this weekend to wear around. I would like to sell these but first I want to make sure they're up to par.. I won't sell something that's going to fall apart. I'm also making a pair for myself to try.
I picked up these awesome hair pins today actually, they are so incredibly funky, and CHEAP.. I couldn't believe it. Since I'm not done making them yet, I don't have pics. By Thursday I will be posting though ;). Now I'm to work on the second donut batch, hopefully I can get all that pesky stickiness off this time!
Happy Crafting~
Phew! I just had a sad because I searched the Mean Look shop on Etsy [as this is where I purchased my bag and arm warmers from them] and got an error message saying they no longer exist! HOWEVER, my intarweb digging has shown that they now sell via Artfire. Good news for me, bad news for my wallet.
Now onto the review!
About a month ago, I bought an adorable Skelanimals bag and a pair of apple tree arm warmers from Mean Look on Etsy. I've been checking out her stuff for quite a while but was attracted when I was told she had a sale going on for 50% off your total purchase. I figured this was the perfect opportunity to buy a couple things I had been drooling over. When I went to enter the coupon code, however, it didn't work. I was disappointed but sent a convo to the owner to ask about it. One of the items I had wanted was labelled as clearance so I thought that may be the problem, I could understand a shop owner not wanting to apply coupons to clearance merchandise. I received a very quick response back telling me that the coupon code had been left up by mistake and had expired but since it was her mistake, she would give me another code to get the 50% discount with. I was ecstatic, I really wasn't expecting to get to use the code on the bag, and since I was going to save so much money on it, I threw in the cute arm warmers as well.
It took about 2 weeks to receive my items, which was faster than I expected since I live in Canada and Mean Look is based in the US. I was so impressed by what I received!
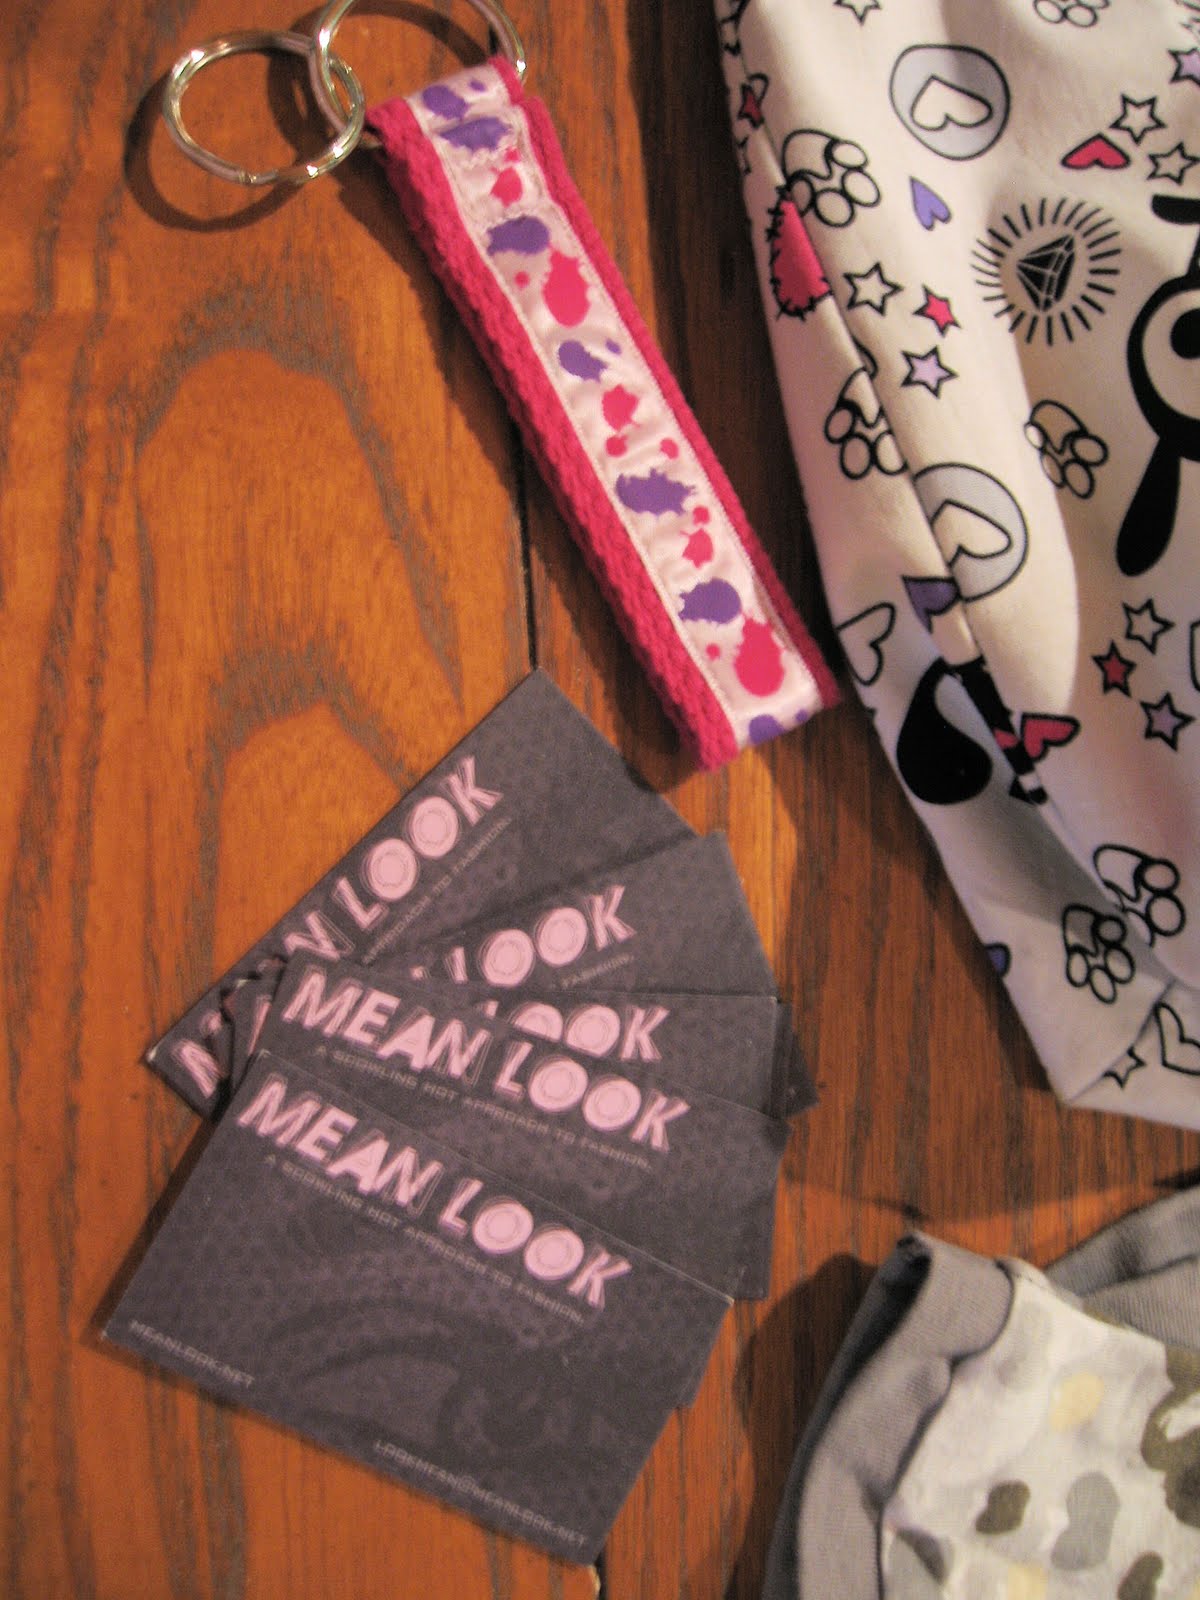


As you can see, everything looks exactly like the pictures from the listings. Now I've had these items for about 2 weeks now and I will admit that I'm hard on my stuff, but there is not a stitch out of place. The bag and arm warmers are made so incredibly well I could probably use them in a game of tug-of-war with my friend's excitable schnauzer and they would survive.

I keep the cards in the bag with me in case someone asks me where I got it from, and btw I have had a crapton of compliments on it! I also love the key ring thing-a-ma-jig because I'm constantly losing my keys in my purses. I put so much stuff in them that I'm always referring to them as 'black holes' and I will spend a good 5 minutes rummaging in them for car keys.
I also keep the arm warmers in the bag, they're quite handy when I'm driving home late at night as my car wheel is always freezing. Also I like the fact that their lack of fingers gives me easy texting access [not in the car though, don't worry, I don't text and drive].
All in all, an awesome online shopping experience. The owner is amazing and the communication was great, I'll be going back and I strongly recommend you do too ;)
The Links:
Mean Look on Artfire
Mean Look on Facebook
As Always, Happy Crafting~
I've been surfing around on Etsy [that site is my downfall, it's the reason I am constantly broke] and normally I just buy makeup but there's a lot of lovely crafters on there that I'm thinking of purchasing from. I'm considering doing little reviews of their shops and merchandise I receive.. I know I will be making at least one purchase next Friday when I get paid. I'm really big on supporting indie businesses.. I would much rather buy a teapot made by someone than one from the Pottery Barn.
So on that note, expect a mini review sometime in the next few days. I recently bought a hand-made bag and arm warmers that I just love and I think the crafter deserves some recognition for her work <3 [I will also include pictures, after I empty the bag which is currently full of my crap]
And now off to do some more cross stitching.. I have one corner completed [except for the outlining and fine detailing, I do all that after the entire piece is complete] and it took me forever! Very relaxing though!
Happy Crafting~
Alright so I had planned on creating the focal piece to that necklace I mentioned last night, but I was told today that there was finally a job posting for a higher position with the company I work for! I've been waiting for this news for a couple months now, and was starting to feel nervous like I wasn't getting anything done.
Needless to say I've been totally distracted by this all night, I put in an internal application and just need to get a printed copy signed by my manager and district manager, which should be a piece of cake since my manager is the one who alerted me to the post and she has already spoken with my DM.
I am just so freaking excited! This isn't even craft-related [although I do work for an arts & crafts store] but I just had to post it :3 The job would allow me to travel all over Canada and it focuses on the part of my job I like the most, which also happens to be the most tedious strangely. I should know by the beginning of May if I got the job or not.. interviews start mid-April.
Ahhh I'm still squee'ing! Alright, I have a birthday party to run tomorrow so I'm off to sleep for now!
Happy Crafting~
Ahhh I'm just too excited! I went on a bit of a buying spree today at work. Seriously, that place is dangerous for me.. it's causing my poor paycheque to deteriorate. I purchased series I and series II of the Pearl Ex powdered pigments along with the Amaco Tri-Bead Roller. The only thing that makes me sad is I can't play with my new toys yet.. well I suppose I COULD but I'm dead tired from work so I would just make a pigmenty mess of myself.
Speaking of pigments.. now I have a use for all that useless mica I bought from the company who shall not be named. I kept it because I knew I could use it in something crafty, so it's nice to know my money won't go to waste. The Pearl Ex pigments though, oh my god, the colour pay off is FANTASTIC. The makeup junkie in me is all "geeze I wish I could use these as shadows" but my common sense ruins the party by reminding me they're not eye safe. For now I'll just gaze at them in their little jars and drool..
My shift is short tomorrow, so when I come home I'm going to make the focal piece for the necklace I've been planning out. It's a donut shaped pendant I'll be making out of polymer clay.. and I plan on etching a very simple flower design in it and using the powders on it. I'll also be fixing some flat back crystals to it.. I'm a junkie for rhinestones and sparkles. I have to hold myself back most of the time because if I add the amount I want my pieces will look ridiculous.
Alright, my sleepy brain is telling me to stop typing.. I'm off to work on my cross stitching!
Happy Crafting~
Alright, so I'm making a couple little plants for some people in the States. A woman I work with was saying she uses the Krylon Crystal Clear Glaze on her sculpey/clay pieces, and since I have almost a full bottle left over from glazing the chess board, I decided to give it a shot. Only complaint is I like the control a brush-on glaze gives me, it's easy for me to get into small crevices without getting glaze all over my hands. Also fumes aren't fun.. but my god the SHINE. The pieces look AMAZING, I mean really, what a difference! I am very impressed, I will be using the Krylon Glaze exclusively from now on.
Highly recommend for all you clay artists out there!
Posted here since my scanner isn't working, pattern taken from this book.
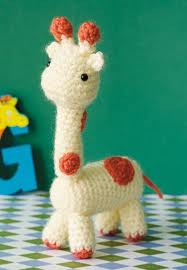
Finished size:
About 8 inches.
Materials:
LION BRAND Vanna's Choice Baby [medium 4] Worsted Weight Yarn [3 1/2 ounces, 170 yards (100 grams, 156 meters) per ball]
1 ball #098 Lamb (A)
1 ball #132 Goldfish (B)
or colours of your choice
crochet hook size G-6 (4.25 mm) or needle sized for gauge
stitch marker
large eyed blunt needle
Additional materials:
2 plastic safety eyes, 6mm in diameter
Fiberfill stuffing
Gauge:
Exact gauge is not essential for this project.
Stitch explanation:
sc2tog (sc decrease)
Insert hook into st and draw up a loop. Insert hook into next st and draw up a
loop. Yarn over, draw through all 3 loops on hook.
Body:
With A, ch 2.
RND 1: Work 6 sc in 2nd ch from hook. Place marker for beg of rnd; move marker up as each rnd is completed.
RND 2: 2 sc in each st around - 12 sts.
RND 3: (2 sc in next st, sc in next st) 6 times - 18 sts.
RNDS 4 - 18: Sc in each st around.
Begin to stuff piece firmly. Continue to stuff as work progresses.
RND 19: (Sc2tog, sc in next st) 6 times - 12 sts.
RND 20: (sc2tog) 6 times - 6 sts. Fasten off.
Head and neck:
With A, ch 2.
RNDS 1 - 5: Work Rnds 1 - 5 of body - 18 sts.
Begin to stuff piece firmly. Continue to stuff as work progresses.
RND 6: 2 sc in each of next 6 sts (for face shaping), sc in last 12 sts - 24sts.
RNDS 7 & 8: Sc in each st around.
RND 9: (Sc2tog) 6 times, sc in last 12 sts - 18 sts.
Following package directions, attach eyes to face.
RND 10: (Sc2tog) 9 times - 9 sts.
RNDS 11 & 12: Sc in each st around. Fasten off.
Legs (make 4)
With B, ch 2.
RND 1: Work 8 sc in 2nd ch from hook; change to A in last st. Place marker for beg of rnd; move marker up as each rnd is completed.
RND 2 - 7: Sc in each st around. Fasten off.
Horns (make 2):
With B, ch 2.
RND 1: Work 4 sc in 2nd from hook. Place marker for bed of rnd; move marker up as each rnd is completed.
RND 2: 2 sc in each st around - 8 sts.
RND 3: (Sc2tog) 4 times; change to A in last st - 4sts.
RNDS 4 & 5: Sc in each st around. Fasten off.
Ears (make 2):
With A, ch 2.
RND 1: Work 4 sc in 2nd ch from hook. Fasten off.
Large spot (make 2):
With B, ch 2.
RNDS 1 & 2: Work Rnds 1 and 2 of Body - 12 sts. Fasten off.
Small spot (make 3):
RND 1: Work Rnd 1 of Body - sts. Fasten off.
Tail:
With B, ch 6. Fast off leaving a 1/2 in. (1.5 cm) end to fray at end of tail.
Finishing:
Sew Neck to Body. Sew Horns to top of Head. Sew Ears to Head. Stuff Legs and sew to Body. Sew Tail to end of Body. Sew Large Spots to Body, and Small Spots to Neck. Weave in ends.
~~~
I wrote that word for word! Also there's a pattern for another one called Georgina the Giraffe here [you may have to sign in/create an account to see it, but it's a free pattern]. I think the one I posted here is cuter, but that's a personal thing! Hope this was helpful :)
PS: if you can, buy the book I linked in the beginning where this pattern is from, the other animals in it are extremely cute ^^.
I'm super excited! After I posted my chess board on one of the many forums I frequent, I had such an interest that I discussed opening a business with one of my best friends. I would not be able to sell the Plants VS Zombies figures as they are protected under the copyright law, but I brainstormed some ideas and shared them with her and she's on board! She's an amazing artist so she will be drawing and I will be recreating the drawings with clay. I don't want to post details until the shop goes up since I already did a quick Etsy search and found our ideas to be unique. Not that I'm trying to flatter myself saying people are actually reading this, but after certain events I've witnessed regarding other sellers I wouldn't want to take a chance someone would beat me to the punch.
I've looked up laws regarding small business in Canada and we would need to get a business license. This doesn't bother me at all, I would like to be all official and such. I want to get all this running before June though since the process for requesting the license will change this summer and it becomes a bit more complicated [more forms].
And in other news: my boyfriend is a sweet heart :) We went out tonight for Valentine's Day and had dinner, he made me two of these cute little cards. When I say made, I mean literally he made them from scratch.. he even made the PAPER. They were adorable and so thoughtful, I was not expecting anything handmade and I really appreciated that he took the time to make those rather than go out and buy them..it just made them that much more special to me. No one I've ever been with has made me anything, and so far on the list these are the third and fourth things he's crafted for me. Apparently he made something else but forgot it at work so I have that to look forward to next time I see him ^^~
The presents I gave him I bought wayyyy in advance. I bought him a giant microbe plushie and also this book called "12 Ways to Say I Love You" that you fill out. I don't really know how to describe it accurately but it's a wonderful gift for anniversaries and other romantic occasions. You can check them out here and definitely check out the giant microbes, they are amazing and the customer service at the site is top notch! There is a seperate site for Canadian orders as well :)
And that's all for tonight!
Happy Crafting~
Alright, so this is what I made for my boyfriend's birthday:
We both play an online game called Plants VS Zombies, and while brainstorming with a friend I decided to make figures from the game out of polymer clay and then to make a wooden chessboard. The whole process took me about a month, but was well worth it! He loved it.

The above picture is the first figure I made. I used two types of plants from the game [each made up an opposing side]: day plants, and night plants. There are also water plants but they're a little more complicated to make. The Chomper is from the day side and I also had to add coloured floral wire after baking to create the stem. There are a few other day plants for which I had to do this. I added after baking rather than before because floral wire is covered with coloured plastic and I was concerned the plastic may melt during the baking process. I made a hole in the base and in the headpiece before baking for the stem to fit in and glued it with industrial strength adhesive.
I really like this adhesive, it provides a very strong bond with a bit of flexibility, which is unlike crazy glue and why I prefer the E6000 to it.

There are definitely a few things I would like to do differently. I bought some circle fondant cutters to cut out the bases but realized when I brought them home that they were a bit too big so I had to mold them by hand due to a time constraint [I really needed to get started THAT night]. I wish they looked more professional but everyone's telling me I'm being too picky, we're always harder on the work when it's our own though!

The board is made out of oak, made by me with a little help from my dad [I'm not that great around circular saws]. I didn't really prime it, I just put on a ton of coats of the light green acrylic paint. I used Folkart and Americana paint on both the board and box used to hold the pieces.

I bought the box from Michaels and primed it with white acrylic before painting it with the green. I used white first because the box was patterned already and the colours were a bit dark. I knew it was going to take quite a few coats to cover and was afraid I would not have enough of the green to do it.
I used painter's tape in a criss-crossed pattern to create the squares on the top of the board. I only did one coat [again, time constraint] but would've liked to do two and make the dark green more opaque.
I finished both the board and box with Krylon glaze. Since I did this in my basement, I didn't have ventilation other than a very slow moving fan. Don't do what I did, using spray glaze/paint without ventilation is NOT a good idea. Normally I would do this sort of thing outside, but it's the winter and so I was unable to.
And that was my project! It was very labour intensive but like I said, totally worth it in the end and I would do it again in a heartbeat. I think it goes without saying, but as a crafter it really makes a difference when you make something for someone who will really appreciate and cherish it. I'm leaving the link to my Flickr photo album for anyone who would like to take a look at additional pictures, there are so many that I don't want to photo dump them here.
Click for more pictures!
Click here to check out Plants VS Zombies!
Happy Crafting~
Alright, so I've been MIA for a while because I've been working on my top secret project! It's a birthday present for my boyfriend. His birthday is today, but his birthday dinner is tomorrow so I will be posting pics and explanations of the project this weekend at some point. For once I have both days off and I'm going to take a nice break! No crafts, no nuthin'.. just sitting on my butt with a book. It's going to be wonderful!
I'll share something I found out today [I'm always learning something new from my co-workers] about painting on canvas with acrylics. I'm sure you more experienced painters out there already know this, but I'm a novice at best so it was news to me! A customer came in today asking what she could use on her finished piece to give it a high gloss finish. I had no clue so I brought over my co-worker, who paints [and is super talented.. the jealous, I have it] and she told the customer that she needed to wait a month for her picture to cure first! I had no clue you needed to wait, but it makes sense since my co-worker told her that even though the paint on top looks and feels dry, the paint underneath may not be. And of course when you spray the gloss on, it keeps the paint underneath from drying completely. Also you need to wait a year to do this with oils. A YEAR.
Good thing I'm terrible with oil paint..
So that is what I learned today! And now to put the finishing touches on my gift!
Happy crafting~
So I took a break from my Sculpey today to make a few bracelets.
The first one I made for a co-worker of mine who is heading to Australia for school. Her last shift is tomorrow [way to leave it to the last minute, I know] and I happen to be working as well. We're both closing so I'm going to give it to her at the end of our shift.
I used a double strand of chain for this bracelet, connecting the two chains with a new link every 5 links. I added green wire wrapped beads [not wrapped by myself, that's next on my list] and light green beads in a flat diamond shape in between the wire wrapped ones. I had bought 3/4" head pins to use but my god the wire is thick on those and hard to work with. I had to make a trip out for more of my trusty 2" head pins and they worked like a charm. I also added a small shamrock to the clasp and glued a green 3mm flat back crystal in the center of it for extra sparkle.
To glue on the flat back, I used Beadalon Bead Fix glue [it's the second one down from the top]. I find it's a lot like crazy glue, but provides a better hold when you're working with metal [as I was here].
The next bracelet I made to send down to the states. I'm in a makeup group on Facebook and one of the girls was kind enough to send me a free sample of a foiling medium [for eye shadows] so I decided to make her a little something to thank her.

I asked her what her favourite colour was prior to making this and she said orange, however I found that to be an impossible colour to find at my store. Normally I would order from my usual supplier online but, since I needed to send this out in the next couple days, I was unable to. I decided to go with these two colours instead because they were as close as I could get. I do like how it turned out though.
I used a completely different chain for this one since the first one I used was a little too plain for what I wanted to achieve. I also added a flower charm to which I glued a 3mm light topaz flat back crystal.
The last bracelet I also made because of someone in my makeup group. One of the girls posted that her friend was having a hard time and we have a system where we send random things to each other as surprises, so she wanted to add her friend's name to the list.

I was told that this girl liked simple jewelry and her favourite colour is green. I used the same chain as in the topaz bracelet and the same beads as in the good luck bracelet. This one is actually my favourite and I wanted to keep it for myself. I actually have enough materials to re-create it, so this is probably what I'll do.
I created all these bracelets "on the fly", I didn't plan them out. I had in mind the chains I had at home and walked around the jewelry section looking for beads that caught my eye. I find I make the best looking pieces when I'm not thinking too hard about what I'm doing. I just lose myself in the project and then suddenly it's done!
I'd like to leave you guys with a link to my favourite jewelry supplier. I use them exclusively for Swarovski beads and flat backs [except in the case of the previous bracelets where I was strapped for time]. Their shipping is fast [they state it may take up to 6 weeks but it only ever takes 2 to reach me], their invoices are easy to read, and their product is packaged extremely well. Highly recommend!
Happy Crafting~
PS: to my friend Tricky- I finally figured out hyperlinking! That was a really durrr moment, thanks for pointing it out to me!
Just a quick post while I'm waiting for some glaze to dry!
A lot of the time, I can't find what I need where I work [I don't know if I've mentioned it before, but I work in Michaels] so I have to go online to search. A couple weeks ago, I was on a quest to find violet and green 12 gauge floral wire, which of course we don't sell. I mean, we have 12 gauge hot pink beading wire, but no purple?
Anyway, I took my search online and found this site:
http://www.widgetsupply.com/
After some quick searching on Wigit Supply, I found EXACTLY what I was looking for:
http://www.widgetsupply.com/page/WS/CTGY/craft-wire-12-gauge
I totally recommend this site if you're a florist or a beader [or anyone who uses wire in their crafting]. It's SUPER cheap [shipping costs next to nothing, and I was shipping to Canada] and it came within 2 weeks.
Lately I've been having a harder time finding the supplies I need so I'm thining online shopping is going to be the way I have to go from now on. I'm always a little weary shopping with a company I don't recognize which is why from time to time I'll put up recommendations like this :D
Happy Crafting~
So my camera is being a bit of a jerk tonight and I couldn't take pictures of my Scupley collection, but I went ahead and started my project anyway!
Took me a good two hours to make the head of one of the characters I'm sculpting.. I'm fairly new to polymer clay and I've only made two things before. I was told by a friend that you could do a project piece by piece, basically only baking one section at a time [letting the section you've previously baked cool thoroughly before adding on]. This would be useful if you're making something that has different parts at a variety of thicknesses as the amount of time you bake the clay depends on it's thickness. I imagine this process would take damn near forever so I took a risk and just made the head in full with all parts attached, then I only baked it once. Everything turned out perfectly! I was especially worried about the teeth as they are tiny and thin and the head was a good 12mm thick. With Sculpey you bake 15 min at 275 degrees [Fahrenheit] for every 6mm, so I threw it in for 30 minutes.
Right now I'm waiting for it to cool so I can glaze it. I'll be using the Sculpey brand glaze, there's others you can use to get the same effect that are cheaper but since I was just starting out I didn't want to take a chance on ruining my project during the final step.
I also used the Sculpey clay softener for the first time. It was EXTREMELY helpful, especially since there were a couple colours I had to create by mixing 2 different clays together. You can do this without the softener but it takes a ton of kneading and patience. The clay softener can also be used to eliminate fingerprint marks from your project and I was told that rubbing alcohol will do the same thing. I didn't try that but after using the softener I'm having a hard time seeing how the rubbing alcohol would work the same way. Rubbing alcohol tends to evaporate pretty quickly and I would imagine it would disappear from the surface of the clay too fast for you to rub the prints away. The Sculpey softener is a but thicker and feels slippery to the touch, it remains on the surface of the clay long enough for you to achieve a nice, smooth surface. I totally recommend picking some of the softener up, especially if you're just starting out.. makes your job a lot easier.
I'll give that rubbing alcohol thing a shot and let you know how it goes.
Alright, I'm pretty sure the head is cooled down enough now so I'm off to glaze!
Happy Crafting~
Ok, last Xmas related post, I swear ;)
As promised [1 day late], I'll post the pics of the wreaths I made this year. Originally I was only going to make one for my Nana but after I made it my mom wanted one as well.
My Nana lives a couple hours away and was coming over for Thanksgiving weekend so I got all my supplies early to makes hers. The good thing about making a seasonal arrangement early is you get your pick of everything since it JUST came in.. the bad thing is nothing is on sale so your wallet cries at the checkout.
When I saw the pictures I thought to myself I should've just used all red roses with that white bow, but at the time I thought the variety would be better? My Nana still loved it.. she's funny, she took it inside when she came over to our house for Christmas because she said it was the prettiest one on her floor [she lives in an apartment building] and she was afraid someone would steal it.
Her wreath cost me a good $80 to create [see what I mean about wallets crying? I think I was crying a little internally as well..] but it was worth it.
Now, the wreath I made for my mum, which was MUCH cheaper..

This one cost me around $30 because I made it in Novemeber and the sales on Christmas decor had started already. I'm not a huge fan of pointsettas but my mom really likes the more traditional Christmas plants/foliage and colours. If it were up to me, the wreath would've been blue and silver and done with magnolias.. probably as FAR from traditional as you can get and still call it a Christmas wreath.
For both wreaths I just used a plain 14" wreath and I used a glue gun to glue everything on. I used a high temp one with my mom's wreath because there are glass ornament balls on it [high temp guns are best to use when it comes to gluing glass]. You'll notice my Nana's wreath also has glass ornaments on it but they were actually Christmas picks and were already glued to a small base of evergreen foliage and a floral pick, so the low temp gun worked fine on them since I wasn't gluing directly onto the glass.
Whew.. and that's it for Christmas [until next year, of course ;)]!
Tomorrow I'm going to get started on my top secret sculpey/wood masterpiece.. I'll take a couple pictures of my sculpey collection and how I store it and give some quick tips I've learned when it comes to baking/shaping the clay.
Until then!
Happy Crafting~
Time for a LATE xmas-related post!
I've been crazy busy but here's a couple projects I did during my holidays:
The week after Christmas I visited my great aunt and uncle in London [Ontario]. My aunty had a stroke a few years back, she's actually the person who taught me to crochet but since her stroke she has been unable to do it herself. I usually crochet her things as gifts, but I was walking around at work and spotted the cutest ornament kit. They were little felt reindeer with bells :)

I like to refer to them as my "emo reindeer" because of the way the "hair" turned out. I got the kit for this on sale for I believe $7.99 [from $11.99]. I was impressed with it, I would buy it again for sure. I have a kit by the same company for a metal star ornament wrapped with wire and green beads that I haven't attempted yet. From the looks of it, there doesn't seem to be enough wire to complete the three stars. It wouldn't surprise me because the only complaint I had with the reindeer kit was that there was not enough brown floss to complete them. Luckily I do a lot of cross stitching so I have a box of floss lying about.
My aunt and uncle loved these reindeer, they were so happy when they saw them. I'm wishing I had bought a second pack.. if they bring them out again next year I will. Then I can attach them to gifts :)
My second project is a floral arrangement I did for my boyfriend's family.


This is my first attempt at a centerpiece, I've only ever made wreaths before this. I'll post those in a seperate entry tomorrow night so this doesn't turn into a photo dump.
The two florists I've worked with through my job taught me everything I know about floral arranging. I will never be able to come close to their talent, but I'm pretty dang good at making loopy bows now ;)
I used a charger plate for the base and one of the Christmas label hurricane vases for the candle holder. I chopped up a bush that had gold pointsettas on it to get the pine boughs [I had to also chop the boughs in half since they were WAY too long] and used a few magnolia stems. I used a high temp hot glue gun to glue the stems into a small piece of floral foam. We were out of Christmas scented candles at the time so I used one that smelled like baked cookies :)
Alright! That's enough of the Christmas stuff for now! More to come tomorrow!
I'm also working on a top-secret project [top-secret because this blog is linked to my Facebook and I'm not sure if the person I'm making it for reads this or not-- don't want to ruin the surprise ;)]. It won't be until mid February when I can reveal it, but I promise it will be awesome! And it will involve a LOT of Sculpey clay.. and wood. No other clues.
That's all for tonight folks!
Happy Crafting~
EDIT: I'm not sure why that one picture is turned sideways and I can't seem to fix it? I'm going to assume my comp is just having an anneurism.

